document.getElementById("IDofIframe").src = "about:blank";
OR
document.frames[ "iframe1"].src = "about:blank ";
10/30/2012
JavaScript let element adapt to window size
<!DOCTYPE HTML PUBLIC "-//W3C//DTD HTML 4.01//EN" "http://www.w3.org/TR/html4/strict.dtd">
<html>
<head>
<meta http-equiv="Content-Type" content="text/html; charset=utf-8">
<title>JavaScript let element adapt to window size</title>
<style type="text/css">
*{margin:0;padding:0;}
#bg{
position:absolute;
top:0px;
left:0px;
z-index:-999;
}
</style>
</head>
<body>
<div id="bg"><img src="http://www.webdm.cn/images/20091016/jihyun-bestibelli06.jpg" alt="HIGH"></div>
<input type="text" id="msg" name="msg" size="50"/>
<script type="text/javascript">
window.onresize = window.onload = function(){
var w,h
if(!!(window.attachEvent && !window.opera))
{
h = document.documentElement.clientHeight;
w = document.documentElement.clientWidth;
}else{
h = window.innerHeight;
w = window.innerWidth;
}
document.getElementById('msg').value ='窗口大小:' + 'width:' + w + '; height:'+h;
var bgImg = document.getElementById('bg').getElementsByTagName('img')[0];
bgImg.width = (w - 5);
bgImg.height= (h-5) ;
}
</script>
</body>
</html>
Submit form to Pop Up Window or Iframe
Submit to POP UP window:
document.form1.action = "test.jsp";
window.open("", 'win', 'width=420px,height=300px,resizable=yes,top=50px,left=200px,toolbar=no, menubar=no, location=no, status=no');
document.form1.target = "win";
document.form1.submit();
window.open("", 'win', 'width=420px,height=300px,resizable=yes,top=50px,left=200px,toolbar=no, menubar=no, location=no, status=no');
document.form1.target = "win";
document.form1.submit();
Submit to IFRAME:
<body>
<form name="form1" method="post" action="test.jsp" target="save">
<input type="submit" name="Submit" value="Submit">
</form>
<iframe src="test.jsp" name="save" height="0" width="0"></iframe>
</body>
10/25/2012
Bat file basic cmd
@echo off
echo Current disk:%~d0
echo Current disk and path:%~dp0
echo Current bat file full path:%~f0
echo 当前盘符和路径的短文件名格式:%~sdp0
echo Current cmd directory:%cd%
echo Current disk:%~d0
echo Current disk and path:%~dp0
echo Current bat file full path:%~f0
echo 当前盘符和路径的短文件名格式:%~sdp0
echo Current cmd directory:%cd%
@echo off
echo 当前盘符:%~d0
echo 当前盘符和路径:%~dp0
echo 当前批处理全路径:%~f0
echo 当前盘符和路径的短文件名格式:%~sdp0
echo 当前CMD默认目录:%cd%
echo 当前盘符:%~d0
echo 当前盘符和路径:%~dp0
echo 当前批处理全路径:%~f0
echo 当前盘符和路径的短文件名格式:%~sdp0
echo 当前CMD默认目录:%cd%
10/24/2012
Java execute jar file using -cp
-cp : To tell java where to find the .class file.
So after you have packaged your project into jar file, then execute:
java -cp .;myClass.jar packname.mainclassname
If there are multiple jar file that need to be referenced, then
java -cp .;c:/classes/myClass.jar;d:/classes/*.jar packname.mainclassname
use ";" to separate each jar file.
packname.mainclassname is used to specify the entrance of the code.
If you code has multiple main method, it's used to specify which main method is to be executed.
10/15/2012
String type To Address type Java
InternetAddress.parse(sb.toString()) => Get a array: InternetAddress[].
While InternetAddress is the subclass of Address. It can be used as Address.
While InternetAddress is the subclass of Address. It can be used as Address.
SMTPAddressFailedException: 530 5.7.1 Authentication Required
When use java mail API to send emails, this error is solved by adding red line.
Properties props = new Properties();
props.put("mail.smtp.host", "XXX");
props.put("mail.smtp.auth", "true");
props.put("mail.smtp.port", "25");
props.put("mail.transport.protocol", "smtp");
props.put("mail.store.protocol", "pop3");
props.put("mail.smtp.username", user);
props.put("mail.smtp.password", password);
props.put("mail.smtp.starttls.enable", "true");
// Session session = Session.getInstance(props, null);
Session session = Session.getDefaultInstance(props,
new javax.mail.Authenticator() {
protected PasswordAuthentication getPasswordAuthentication() {
return new PasswordAuthentication("username", "password");
}
});
msg = new MimeMessage(session);
10/11/2012
Installation of Direct Project
1. Download version 1.3.1 - direct-project-stock-1.3.1.tar.gz.
2. Unzip direct-project-stock-1.3.1.tar.gz to C:\ or D:\, for exmapke


 Click on Certificates.
Select p12 certificate, for example, D:\direct\tools\california.directproject.org.p12
Choose ENABLED as the status.
Click on Add Certificate


D:\DIRECT
+---apache-tomcat-7.0.23
+---DirectDNSServices
+---james-2.3.2
+---tools
3. Modify D:\DIRECT\apache-tomcat-7.0.23\bin\catalina.bat to add
set CATALINA_OPTS=%CATALINA_OPTS% -XX:PermSize=256M -XX:MaxPermSize=256M
set JAVA_OPTS=%JAVA_OPTS% -Dorg.apache.cxf.io.CachedOutputStream.Threshold=1000000
4. Modify D:\direct\james-2.3.2\apps\james\SAR-INF\config.xml to have correct hostname of James
.
<postmaster>postmaster@california.directproject.org</postmaster>
.
.
.
<servernames autodetect="true" autodetectIP="true">
<servername>california.directproject.org</servername>
</servernames>
.
.
.<mailet match="RecipAndSenderIsNotLocal=california.directproject.org"
class="NHINDSecurityAndTrustMailet">
<ConfigURL>http://localhost:8081/config-service/ConfigurationService</ConfigURL>
</mailet>
This means that internal email exchange in same network do not use encryption.
5. Generate Certificates:


6. start Tomcat
Log into http://localhost:8081/config-ui with username:admin and password:adm1nD1r3ct


Click Create New Domain on
Domain Name: california.directproject.org
Postmaster: postmaster@california.directproject.org
Choose ENABLED as the status.
click Add
+---apache-tomcat-7.0.23
+---DirectDNSServices
+---james-2.3.2
+---tools
set CATALINA_OPTS=%CATALINA_OPTS% -XX:PermSize=256M -XX:MaxPermSize=256M
set JAVA_OPTS=%JAVA_OPTS% -Dorg.apache.cxf.io.CachedOutputStream.Threshold=1000000
4. Modify D:\direct\james-2.3.2\apps\james\SAR-INF\config.xml to have correct hostname of James
.
<postmaster>postmaster@california.directproject.org</postmaster>
.
.
.
<servernames autodetect="true" autodetectIP="true">
<servername>california.directproject.org</servername>
</servernames>
.
.
.<mailet match="RecipAndSenderIsNotLocal=california.directproject.org"
class="NHINDSecurityAndTrustMailet">
<ConfigURL>http://localhost:8081/config-service/ConfigurationService</ConfigURL>
</mailet>
This means that internal email exchange in same network do not use encryption.
5. Generate Certificates:
Execute D:\DIRECT\tools\java -classpath
.;./lib/* org.nhindirect.stagent.cert.tools.certgen.DirectProjectCertGenerator

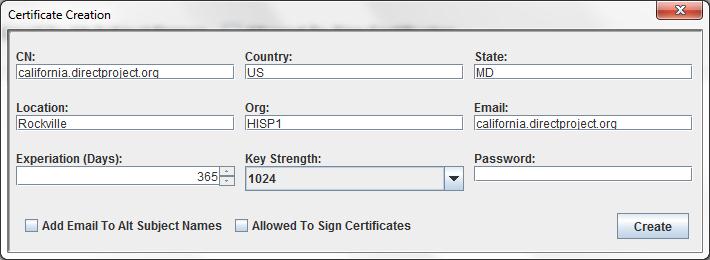
Fill the form like below:

You can choose email and password, or you can leave them empty.
Click on Create.

Click OK.

Now click on Create Leaf Cert.

Now you can choose which kind of certificates you wanna generate.
1. Organization Level Certificate.
In this case, in the email field, input the domain name.
2. Personal Level Certificate.
In this case, in the email field, input the personal email address.
Now, we use Organization Level Certificate as example. Click on Create.

- cd D:\direct\apache-tomcat-7.0.23\bin
- startup.bat
7. Config Service


Domain Name: california.directproject.org
Postmaster: postmaster@california.directproject.org
Choose ENABLED as the status.
click Add


Click the Anchors tab.
select Certificate, for example, D:\direct\tools\california.directproject.org Root CA.der
Check Incoming and Outgoing.
Choose ENABLED as the status.
Click on Add Anchor
select Certificate, for example, D:\direct\tools\california.directproject.org Root CA.der
Check Incoming and Outgoing.
Choose ENABLED as the status.
Click on Add Anchor
If you have other trusted direct network's CA, add their CA in trusted anchor. For example, I have added a trusted direct network: florida.directproject.org.
 Click on Certificates.
Select p12 certificate, for example, D:\direct\tools\california.directproject.org.p12
Choose ENABLED as the status.
Click on Add Certificate
Click on DNS Entries.
The configuration here depends on the network configuration of your company.
The "must" field to make direct project work is the "A" Record, "SOA" Record and "MX" Record.
Those are to config your DNS, and mail server.
In this example, I use two local computer "172.16.61.56" and "10.100.10.152" as the DNS server and mail server, and to simulate two direct network "california.directproject.org" and "florida.directproject.org".
In this way, the configuration is as below:


Click on Agent Setting
Add setting key:PrivateStoreType with value:WS
Add setting key:AnchorStoreType with value:WS
Add setting key:PublicStoreType with value:DNS,WS
Add setting key:RawMessageSaveFolder with value:RawMsgFolder
Add setting key:PrivateStoreType with value:WS
Add setting key:AnchorStoreType with value:WS
Add setting key:PublicStoreType with value:DNS,WS
Add setting key:RawMessageSaveFolder with value:RawMsgFolder
Add setting key:IncomingMessageSaveFolder with value:IncomingMsgFolder
Add setting key:OutgoingMessageSaveFolder with value:OutgoingMsgFolder
Add setting key:DNSServerBindings with value:0.0.0.0
Add setting key:DNSServerPort with value:53


11. Config DNS of the local connection

 dig -t ns california.directproject.org


8. Install the Direct DNS Service
Windows Installation
The DNS server runs as Windows service on Windows deployments. To install as a service:
- Launch a command shell and navigate to the DirectDNSServer/bin directory.
- Run the command DirectDNSServer install
This will install as the server as a windows service that starts automatically on system boot up. You should be able to see the service in the Windows service control panel (services.msc).
To start the server, use one of the following methods:
- Right click on the service in the service control panel and click start.
- In a command shell, run the command DirectDNSServer start.
To stop the server, use one of the following methods:
- Right click on the service in the service control panel and click stop.
- In a command shell, run the command DirectDNSServer stop.
To uninstall the server:
- Stop the service using of the method described above.
- Launch a command shell and navigate to the DirectDNSServer/bin directory.
- Run the command DirectDNSServer remove
NOTE: The service runs as process named wrapper-windows-x86-32.exe. If for some reason the service hangs or will not stop, you can terminate it manually by killing this process.
Running Interactively
For debugging or troubleshooting purposes, you may need to run the service interactively. Running interactively is the same across all platforms.
- Open a terminal shell and navigate to the DirectDNSServer/bin directory.
- Run the command DirectDNSServer console.
The service will output all logging to the current console and the log file. To terminate the interactive service, simply press CTRL+C (Control C).
The service deployment is configured using a file named wrapper.conf found in the ./conf directory of the service's directory structure. The service script files read this configuration file to set runtime attributes such as classpath, logging locations and thresholds, JVM arguments, and application arguments. The service itself is just a plain Java application, but is wrapped by a series of deployment classes that are intialized and launched by the service script.
The configuration file in most cases does not need a lot of modification, however there a few settings that will need adjustment depending on your deployment.
# Java Additional Parameters
wrapper.java.additional.1=-Djava.security.policy=conf/policy.all
wrapper.java.additional.2=-Dorg.apache.commons.logging.Log=org.apache.commons.logging.impl.SimpleLog
wrapper.java.additional.3=-Dorg.apache.commons.logging.simplelog.defaultlog=info
.
.
.
# Application parameters.  Add parameters as needed starting from 1
wrapper.app.parameter.1=org.nhindirect.dns.service.SimpleServiceRunner
wrapper.app.parameter.2=-p
wrapper.app.parameter.3=53
wrapper.app.parameter.4=-b
wrapper.app.parameter.5=0.0.0.0
wrapper.app.parameter.6=-u
wrapper.app.parameter.7=http://localhost:8081/config-service/ConfigurationService
wrapper.app.parameter.8=-m
wrapper.app.parameter.9=SERVER
Typical settings that may need adjustment.
| Setting | Description |
|---|---|
| -Dorg.apache.commons.logging.simplelog.defaultlog | The logging threshold. Valid value: fatal: Severe errors that cause premature termination error: Other runtime errors or unexpected conditions. warn: Use of deprecated APIs, poor use of API, 'almost' errors, other runtime situations that are undesirable or unexpected, but not necessarily "wrong". info (default): Interesting runtime events such as startup/shutdown. debug: Detailed information on flow of through the system. trace: Even more detailed information such as entering and exiting methods. |
| wrapper.app.parameter.2=-p | The IP port that the DNS server will use for listening for DNS queries. The default is 53. NOTE: Some operating systems may require the service to run with elevated account privileges to open ports in this range. |
| wrapper.app.parameter.4=-b | The IP addressed on the local machine that the service will bind to. Multiple IP addresses are separated with a comma. The default is 0.0.0.0 which means the service will bind to all IP addresses on the machine (including the loopback address of 127.0.0.1) |
| wrapper.app.parameter.6=-u | This is the URL of the location of the DNS records. Generally this will be the URL of the Direct Project configuration web service. |
Some of these parameters can be over ridden with settings in the configuration service. See the protocol configuration for more details.
9. Create Email Account
- start James
- cd D:\direct\james-2.3.2\bin
- run
- add user devdrfirst with password: drfirst
telnet localhost 4555
JAMES Remote Administration Tool 2.3.2
Please enter your login and password
Login id:
root
Password:
root
Welcome root. HELP for a list of commands
adduser bo(username) XXX(psw)
User bo added
- Replace US_export_policy.jar and local_policy.jar under ${JAVA_HOME}\jre\lib\security\ with Java Cryptography Extension (JCE) Unlimited Strength Jurisdiction Policy Files 6
(US_export_policy.jar and local_policy.jar)

12. Test the DNS configuration.
Use Dig tool.
Execute in cmd:
dig -t cert california.directproject.org
Result should be:

Result should be:

12. Configure the Email Client. Using Thunderbird.

Click on Continue and then click on Manual Config. Config like below.

And click on Done. Now you have setup your mailbox.
The procedure on the other machine "10.100.10.152" is the same.
Then, you can test your two direct network. Sending emails back and forth.
Reference:
http://wiki.directproject.org/Documentation+Library (JAVA implementation Documents)
http://wiki.directproject.org/Java+Reference+Implementation (Java Reference Implementation)
http://api.nhindirect.org/java/site/dns/1.2.1/users-guide/ (Config DNS user guide)
http://api.nhindirect.org/java/site/dns/1.2.1/users-guide/dns-record-config.html (Config DNS services)
http://api.nhindirect.org/java/site/dns/1.2.1/users-guide/dns-serv-depl.html (DNS service deployment)
http://api.nhindirect.org/java/site/gateway/1.5/users-guide/smtp-depl-wsconfig.html#Anchors (Config Domain and Anchor)
http://api.nhindirect.org/java/site/gateway/2.0/users-guide/ (Gateway service user guide)
http://api.nhindirect.org/java/site/gateway/2.0/users-guide/depl-james.html#Message_Monitoring_and_Delivery_Notification (James Deployment)
10/10/2012
Java compile/run files that need external jar files
If developer wants to compile the java files with external jar files.
For example. Compile EmailTest.java with jar files: mail.jar. Put the jar file under the same directory with the java file, and execute in the cmd line:
javac -cp mail.jar EmailTest.java
Then we can see that the class file EmailTest.class is generated.
Then execute the java code:
Now I have a problem. I have tried
java -classpath mail.jar EmailTest
But it does not work. I have to put the mail.jar to the jre/lib/ext, and then execute
java EmailTest
Then it works.
I'll keep looking for other ways.
Except for that I read from other post. We can wrap the jar file with the code into new jar file and execute that jar file. Then it'll work fine.
java -jar XXX.jar
10/09/2012
Win 7 Check Port usage
If we want to find out who's using the port 8008, execute in cmd:
C:\Documents and Settings\Administrator>netstat -aon|findstr 8008
TCP 0.0.0.0:8008 0.0.0.0:0 LISTENING 2596
TCP 0.0.0.0:8008 0.0.0.0:0 LISTENING 2596
This means that Port 8008 is used by process 2596
Now execute:
C:\Documents and Settings\Administrator>tasklist|findstr "2596"
javaw.exe 2596 Console 0 33,036 K
Now we find out javaw.exe is the process 2596. It's using port 8008
If not found, open task manger to find which process is 2596
10/08/2012
Win7 Modify Hosts file
1. Open Host file in administrator role. For example, you can open notepad++ in admistrator role and then open Hosts in notepad++.
2. Modify the file.
3. Open cmd, execute ipconfig /flushdns to refresh the DNS cache. If browser is opened, close the browser.
4. Try to ping the new added domain.
Done!
Note: nslookup only check the DNS server. It DONOT check the Hosts file.
Reference:
http://xjsunjie.blog.51cto.com/999372/743759
2. Modify the file.
3. Open cmd, execute ipconfig /flushdns to refresh the DNS cache. If browser is opened, close the browser.
4. Try to ping the new added domain.
Done!
Note: nslookup only check the DNS server. It DONOT check the Hosts file.
Reference:
http://xjsunjie.blog.51cto.com/999372/743759
Subscribe to:
Comments (Atom)